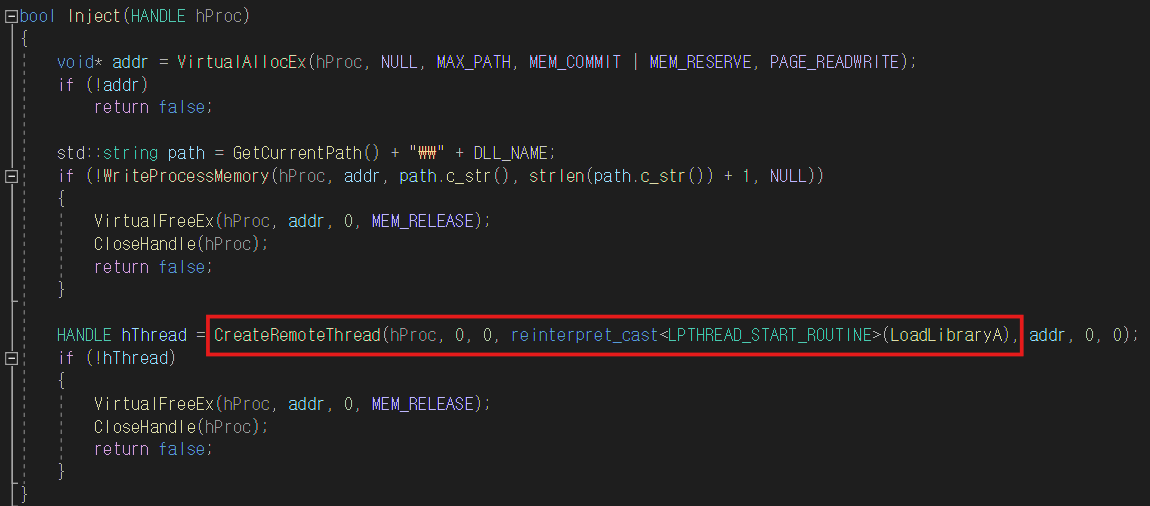
figure 1. CreateRemoteThread Codes
핵 개발 팀에서 제작중인 핵을 분석할 결과 역시 일반적인 DLL injection 방식인 CreateRemoteThread를 통해 LoadlibraryA를 사용하여 지정된 경로의 dll을 인젝션 하는 방식을 사용하였다.
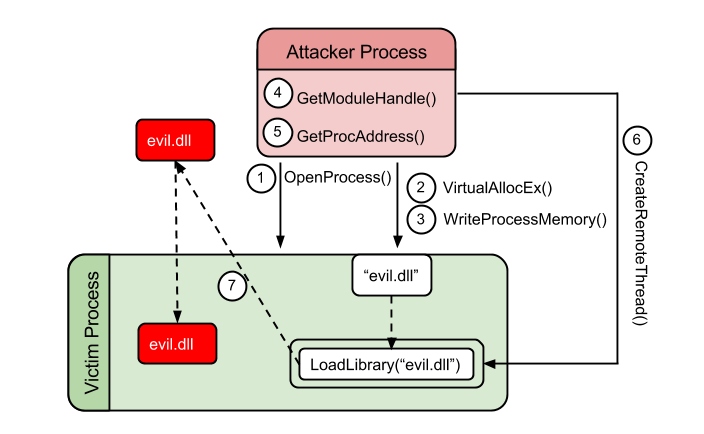
figure 2 . How DLL injection basic
이 방식은 가장 많이 사용되는 유명한 dll injection 방식이다.
OpenProcess()함수로 실행중인 Victim 프로세스 (우리는 게임)를 연다.
VirtualAllocEx()함수로 Victim 프로세스 에 공간을 할당한다.
WriteProcessMemory()할당된 공간에 원하는 문자열이나 바이트를 주입시킨다. ( ex . “evil.dll”의 절대 경로 )
GetModuleHandle()로 Kernel32 모듈을 가져온다.
Kernel32.dll 이란?
Windows 운영 체제의 핵심 구성 요소 중 하나인 동적 링크 라이브러리(DLL) 파일이다.
즉, 메모리 관리 프로세스 및 스레드 관리 , 파일 입출력 등등 응용프로그램이 정상적으로 작동하기 위해 반드시 필요함
실제로 간단한 hello world\n 을 출력하는 코드를 작성해도 Windbg로 모듈을 보면

figure 3 . Windbg example
Kernel32가 있는 것을 확인 할 수 있다.
GetProcAddress()로 Kernel32 안에 존재하는LoadLibraryA함수의 주소를 가져온다.
LoadLibraryA 함수란? Windows API 함수 중 하나로, 특정 동적 링크 라이브러리(DLL) 파일을 로드하는 데 사용됩니다.
CreateRemoteThread()로 타겟 프로세스의 원격스레드를 생성하고LoadLibraryA함수를 실행시킨다 이때 아까 프로세스 내에 주입시킨 문자열을 사용한다. ( ex . “evil.dll”의 절대 경로 )
따라서 evil.dll 을
LoadLibraryA 로 dll 을 프로세스의 올릴 수 있는 것이다.CreateRemoteThread : how to make anti-cheat
우리는 그럼 이제 어떻게
CreateRemoteThread 를 막을 수 있을까에 대한 초기 설계를 시작했다.방법론은 다음과 같다.
- Hooking을 통해
LoadLibraryA사용 제한
- 핵에서 자주 쓰이는 어셈블리어를 프로세스 내에서 탐지
- 게임 외부에서 핵의 프로세스를 탐지
이중 우리가 고려한점은 다음과 같다
게임의 성능을 위한 검사를 위한 Overhead가 적은 것
간단하면서 강력한 방법
기존에 설명했듯이 DLL을 실행시키기 위한 기존 접근은
LoadLibraryA 에서 시작한다. 또한 Hooking은 탐지를 위한 Overhead가 적은 점을 좋게 보았다.Hooking을 통해
LoadLibraryA 사용 제한 - 채택Hooking
hooking은 여러가지 방식으로 존재할 수 있다. 그중 대표적인 것은
- IAT 후킹 (Import Address Table Hooking)
- EAT 후킹 (Export Address Table Hooking)
- 인라인 후킹 (Inline Hooking)
이 중 우리가 채택한 방식은 인라인 후킹 (Inline Hooking) 이다.
가장 큰 이유는 1,2 방식은 알다 시피 Address Table을 수정하여 간단히 후킹을 하는 방식이다.
하지만, 인라인 후킹은 타겟 함수 시작 부분에 코드 인젝션을 하여 후킹을 진행하는 신기한 방식이며 상당히 효율적이라고 생각해서 채택하였다.
Detours 라이브러리
마이크로소프트에서 제공하는 인라인 후킹을 위한 라이브러리이다. 다양한 도구를 제공하며 이를 통해 인라인 후킹을 구현하고자 하였다.
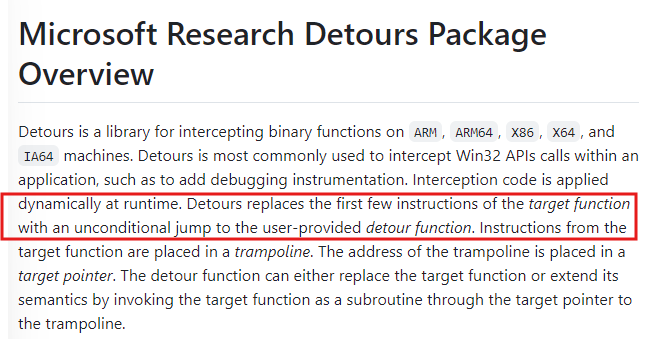
Detours 공식 문서에 따르면 instructions을 바꾼다는 말이 있다. 즉, 인라인 후킹을 위한 tool을 제공한다.
시행착오 Detours x86
nmake가 안됨
→ Development Prompt for visual studio cmd 창으로 nmake를 치면 됨
library machine type 'x86' conflicts with target machine type 'x64' 컴파일 오류
→ nmake 를 실행시키기 전 다음과 같은 설정이 필요
SET DETOURS_TARGET_PROCESSOR=X64
CALL "C:\Program Files (x86)\Microsoft Visual Studio\2017\Enterprise\VC\Auxiliary\Build\vcvars64.bat"
NMAKE
sn.exe 파일이 없다.
→ visual studio 에서 ".NET Framework 4.8 개발 도구” 을 다운로드
수많은 시행착오를 해결한 뒤 Detours 라이브러리를 사용할 수 있었다.
AntiCheat 1차 구현
이제 우리가 구현할 핵심 부분은
LoadLibraryA 에 대한 훅 함수를 제작하여 제한을 하면 된다.
LoadLibraryA 와 같은 중요한 함수를 제한이 가능한 이유는 다음과 같다.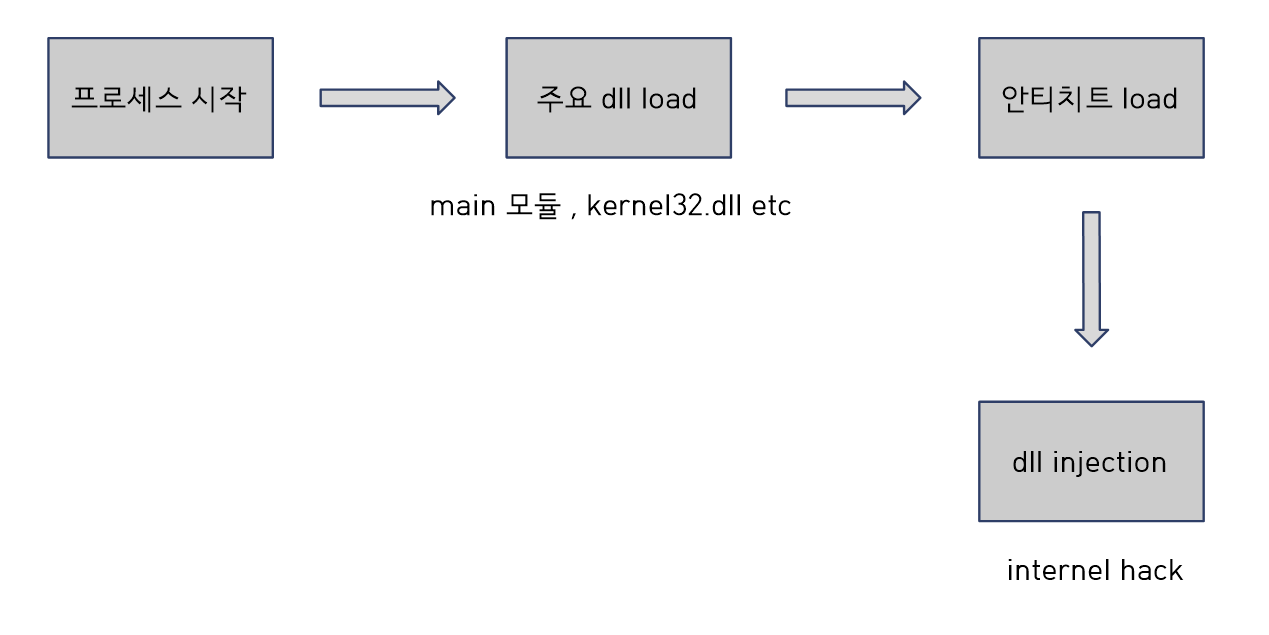
figure 4 . Anticheat flow
프로세스가 시작된 이후 바로 프로세스의 필수적인 dll이 load된다. 그 이후에 우리가 제작한 안티치트가 load 되므로 hook함수를 통해 제한과 탐지를 해도 문제가 되지 않는다.
DLL의 경우 프로세스 실행 시작 시 필요한 DLL들을 모두 불러오는 암시적 링킹과 런타임 도중 원하는 함수만 불러와서 동작하는 명시적 링킹이 모두 가능하다
만약
loadlibrary 함수 자체를 막아버릴 경우 암시적 링킹은 문제가 없겠지만 런타임 도중에 불러오는 명시적 링킹의 경우 필요한 DLL을 불러오지 못해 문제가 생길 수 있다.이러한 문제를 해결하기 위해 필수 DLL 목록을 만들어
loadlibrary가 불러오는 DLL이 필수 DLL에 포함되는 경우에만 함수를 실행하는 형태로 안티치트를 구현하고자 한다.코드 구현
dll 파일의 main 함수는 DllMain으로 구현된다. 여기에는 ul_reason_for_call 로 통해 상태마다 행동을 구현할 수 있다.
DllMain 코드
BOOL APIENTRY DllMain(HMODULE hModule, DWORD ul_reason_for_call, LPVOID lpReserved) {
	BOOL Init_Antidbg = false;
	Known_dll_init();
	switch (ul_reason_for_call) {
	case DLL_PROCESS_ATTACH:
		//printf("Anticheat working now.\n");
		//fflush(stdout);
		MessageBox(NULL, TEXT("Anticheat working now."), TEXT("Anticheat_WG"), MB_OK);
		HookFunctions();


		// FindWindow를 사용하여 WinDbg 창 검색
		if (IsWinDbgRunning()) {
			Init_Antidbg = true;
			MessageBox(NULL, TEXT("WinDbg detected!"), TEXT("Anticheat_WG"), MB_OK);
		}
		else if (IsCheatEngineRunning()) {
			Init_Antidbg = true;
			MessageBox(NULL, TEXT("CheatEngine detected!"), TEXT("Anticheat_WG"), MB_OK);

		}
		else {
			SetDebuggerCheckTimer(); // 디버거 체크 시작
		}

		break;
	case DLL_PROCESS_DETACH:
		//printf("Anticheat ending now.\n");
		//fflush(stdout);
		MessageBox(NULL, TEXT("Anticheat ending."), TEXT("Anticheat_WG"), MB_OK);
		UnhookFunctions();
		if (!Init_Antidbg)
			KillTimer(NULL, 0); // 디버거 체크 끝!
		break;
	}
	return TRUE;
}
DLL_PROCESS_ATTACH 이 상태는 dll이 맨처음 프로세스에 Atttah( load ) 될때, 실행되는 상태이다.
이 상태 일때 먼저,
Known_dll_init 함수를 실행시켜 필수 dll 목록을 만들어낸다.Known_dll_init 함수void Known_dll_init() { DLLset.insert("AkSoundSeedAir.dll"); DLLset.insert("AkRoomVerb.dll"); DLLset.insert("AkSilenceGenerator.dll"); DLLset.insert("AkPeakLimiter.dll"); DLLset.insert("AkTimeStretch.dll"); DLLset.insert("AkGain.dll"); DLLset.insert("MasteringSuite.dll"); DLLset.insert("AkToneGen.dll"); DLLset.insert("AkFlanger.dll"); DLLset.insert("AkRecorder.dll"); DLLset.insert("AkSineTone.dll"); DLLset.insert("AkSynthOne.dll"); DLLset.insert("AkStereoDelay.dll"); DLLset.insert("AkMatrixReverb.dll"); DLLset.insert("AkParametricEQ.dll"); DLLset.insert("AkExpander.dll"); DLLset.insert("AkGuitarDistortion.dll"); DLLset.insert("boost_thread-vc142-mt-x64-1_70.dll"); DLLset.insert("boost_python39-vc142-mt-x64-1_70.dll"); DLLset.insert("boost_atomic-vc142-mt-x64-1_70.dll"); DLLset.insert("boost_system-vc142-mt-x64-1_70.dll"); DLLset.insert("libvorbisfile_64.dll"); DLLset.insert("libogg_64.dll"); DLLset.insert("dvp.dll"); DLLset.insert("boost_chrono-vc142-mt-x64-1_70.dll"); DLLset.insert("boost_iostreams-vc142-mt-x64-1_70.dll"); DLLset.insert("McDSP.dll"); DLLset.insert("AkSoundEngineDLL.dll"); DLLset.insert("Auro.dll"); DLLset.insert("iZotope.dll"); DLLset.insert("AkReflect.dll"); DLLset.insert("nvngx_dlss.dll"); DLLset.insert("OpenImageDenoise.dll"); DLLset.insert("tbb.dll"); DLLset.insert("tbb12.dll"); DLLset.insert("D3D12Core.dll"); DLLset.insert("boost_program_options-vc142-mt-x64-1_70.dll"); DLLset.insert("boost_regex-vc142-mt-x64-1_70.dll"); DLLset.insert("tbb.dll"); DLLset.insert("EOSSDK-Win64-Shipping.dll"); DLLset.insert("xaudio2_9redist.dll"); DLLset.insert("libvorbis_64.dll"); DLLset.insert("steam_api64.dll"); DLLset.insert("GFSDK_Aftermath_Lib.x64.dll"); DLLset.insert("dbghelp.dll"); DLLset.insert("libEGL.dll"); DLLset.insert("libGLESv2.dll"); DLLset.insert("libcef.dll"); DLLset.insert("libEGL.dll"); DLLset.insert("libGLESv2.dll"); DLLset.insert("chrome_elf.dll"); DLLset.insert("d3dcompiler_47.dll"); DLLset.insert("AkCompressor.dll"); DLLset.insert("AkHarmonizer.dll"); DLLset.insert("AkDelay.dll"); DLLset.insert("AkAudioInput.dll"); DLLset.insert("AkTremolo.dll"); DLLset.insert("AkPitchShifter.dll"); DLLset.insert("Ak3DAudioBedMixer.dll"); }
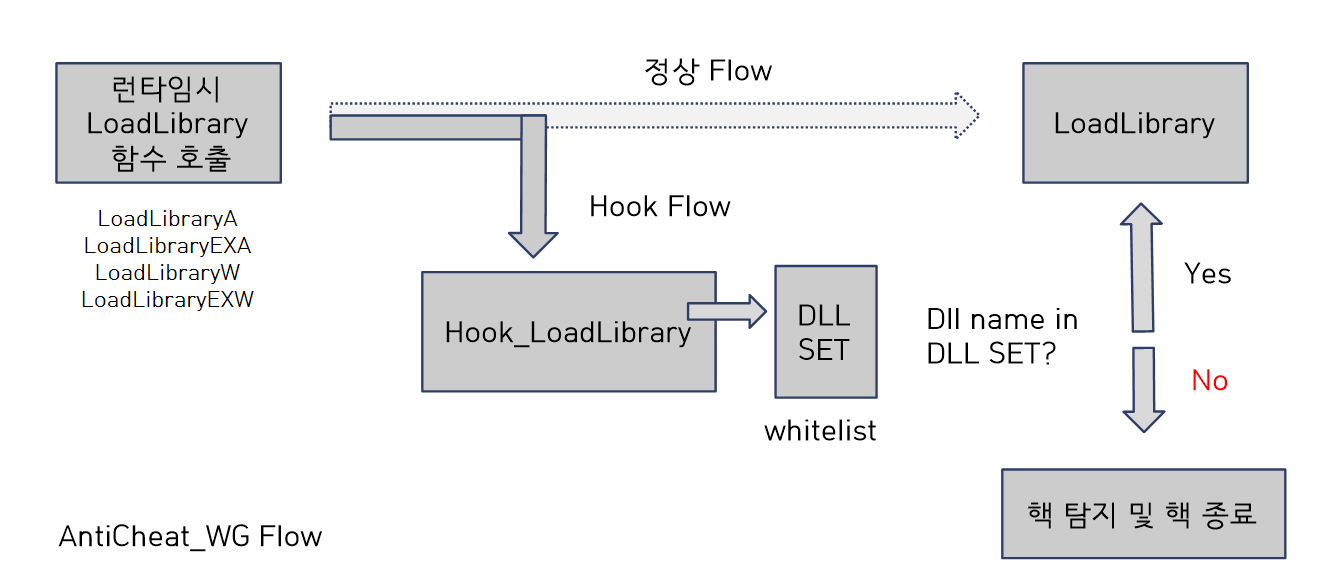
위 함수를 통해 만들어진 DLLset은 이후 hooking된 함수에서 로드하려는 dll이 정상 dll인지 확인하는데 사용된다. 즉, 화이트리스트 방식으로 작동되는 안티치트를 설계하였다.
그 다음으로 훅 함수를 만드는 HookFunctions 함수를 실행시킨다.
HookFunctions 함수 // Anticheat가 삽입 될때 void HookFunctions() { DetourRestoreAfterWith(); // Detours 초기화 DetourTransactionBegin(); DetourUpdateThread(GetCurrentThread()); fflush(stdout); //Real_CreateRemoteThread 는 원래 RemoteThread 함수의 주소 Real_CreateRemoteThread = (CreateRemoteThread_t)GetProcAddress(GetModuleHandle(TEXT("kernel32.dll")), "CreateRemoteThread"); if (Real_CreateRemoteThread != NULL) { //printf("Real_CreateRemoteThread address: %p\n", (void*)Real_CreateRemoteThread); //fflush(stdout); char message[256]; sprintf_s(message, sizeof(message), "Real_CreateRemoteThread address: %p", (void*)Real_CreateRemoteThread); MessageBoxA(NULL, message, "Anticheat_WG", MB_OK); LONG error = DetourAttach(&(PVOID&)Real_CreateRemoteThread, (PVOID)Hooked_CreateRemoteThread); if (error == NO_ERROR) { //printf("DetourAttach succeeded.\n"); //fflush(stdout); } else { MessageBox(NULL, TEXT(" Detour Attach Failed."), TEXT("Anticheat_WG Error"), MB_OK); } } Real_LoadLibraryA = (LoadLibraryA_t)GetProcAddress(GetModuleHandle(TEXT("kernel32.dll")), "LoadLibraryA"); if (Real_LoadLibraryA != NULL) { //printf("Real_LoadLibraryA address: %p\n", (void*)Real_LoadLibraryA); //fflush(stdout); char message[256]; sprintf_s(message, sizeof(message), "Real_LoadLibraryA address: %p", (void*)Real_LoadLibraryA); MessageBoxA(NULL, message, "Anticheat_WG", MB_OK); LONG error = DetourAttach(&(PVOID&)Real_LoadLibraryA, (PVOID)Hooked_LoadLibraryA); if (error == NO_ERROR) { //printf("DetourAttach for LoadLibraryA succeeded.\n"); //fflush(stdout); } else { MessageBox(NULL, TEXT(" Detour Attach Failed."), TEXT("Anticheat_WG Error"), MB_OK); } } DetourTransactionCommit(); }
중요한 부분을 설명하자면,
	DetourRestoreAfterWith();  // Detours 초기화
	DetourTransactionBegin();
	DetourUpdateThread(GetCurrentThread());
인라인 후킹을 위해 초기화를 진행하며 race condition을 방지하기 위한 API를 실행시킨다. ( 원자성 )
Real_CreateRemoteThread = (CreateRemoteThread_t)GetProcAddress(GetModuleHandle(TEXT("kernel32.dll")), "CreateRemoteThread");
Real_LoadLibraryA = (LoadLibraryA_t)GetProcAddress(GetModuleHandle(TEXT("kernel32.dll")), "LoadLibraryA");
기존 kernel32.dll 에 존재하는 CreateRemoteThread 와 LoadLibraryA 함수의 주소를 각각의 변수로 옮긴다.
LONG error = DetourAttach(&(PVOID&)Real_CreateRemoteThread, (PVOID)Hooked_CreateRemoteThread);
LONG error = DetourAttach(&(PVOID&)Real_LoadLibraryA, (PVOID)Hooked_LoadLibraryA);
어떻게 보면 핵심 코드이다. 위에서 가져온 각각의 함수들의 주소에는 CreateRemoteThread 나 LoadLibraryA 함수를 실행시키는 정상적인 명령어가 존재 할것이다. 이 명령어를 미리 정의해놓은 Hooked_CreateRemoteThread 함수와 Hooked_LoadLibraryA 함수의 주소로 JMP 시키는 명령어를 주입시킨다.
DetourTransactionCommit();
이제 실제로 Hook을 적용시킨다.
Hook 함수
HANDLE WINAPI Hooked_CreateRemoteThread(
	HANDLE hProcess,
	LPSECURITY_ATTRIBUTES lpThreadAttributes,
	SIZE_T dwStackSize,
	LPTHREAD_START_ROUTINE lpStartAddress,
	LPVOID lpParameter,
	DWORD dwCreationFlags,
	LPDWORD lpThreadId
) {

	MessageBox(NULL, TEXT("CreateRemoteThread called! Blocking this call By Anticheat_WG"), TEXT("Anticheat_WG"), MB_OK);
	return NULL;
}

HMODULE WINAPI Hooked_LoadLibraryA(LPCSTR lpLibFileName) {
	std::string dllname(lpLibFileName);
	if (DLLset.find(dllname) == DLLset.end()) {

		MessageBox(NULL, TEXT("LoadLibraryA called! Blocking this call By Anticheat_WG"), TEXT("Anticheat_WG"), MB_OK);
		return NULL;
	}
	else {
		return Real_LoadLibraryA(lpLibFileName);
	}

}
Hooked_CreateRemoteThread 함수는 CreateRemoteThread 자체를 제한시키고Hooked_LoadLibraryA 을 통해 LoadLibraryA 에서 자체적으로 화이트리스트를 통한 dll injection을 검사하고 탐지한다.if (DLLset.find(dllname) == DLLset.end()) { MessageBox(NULL, TEXT("LoadLibraryA called! Blocking this call By Anticheat_WG"), TEXT("Anticheat_WG"), MB_OK); return NULL; } else { return Real_LoadLibraryA(lpLibFileName); }
즉,
DLLset 에 들어가 있는 dll 이면 정상적인 flow인 Real_LoadLibraryA 을 실행시키고들어가 있지 않으면 메세지를 출력한뒤 종료시킨다.
안티치트 적용 ( with. 핵 개발팀 안현진님 )
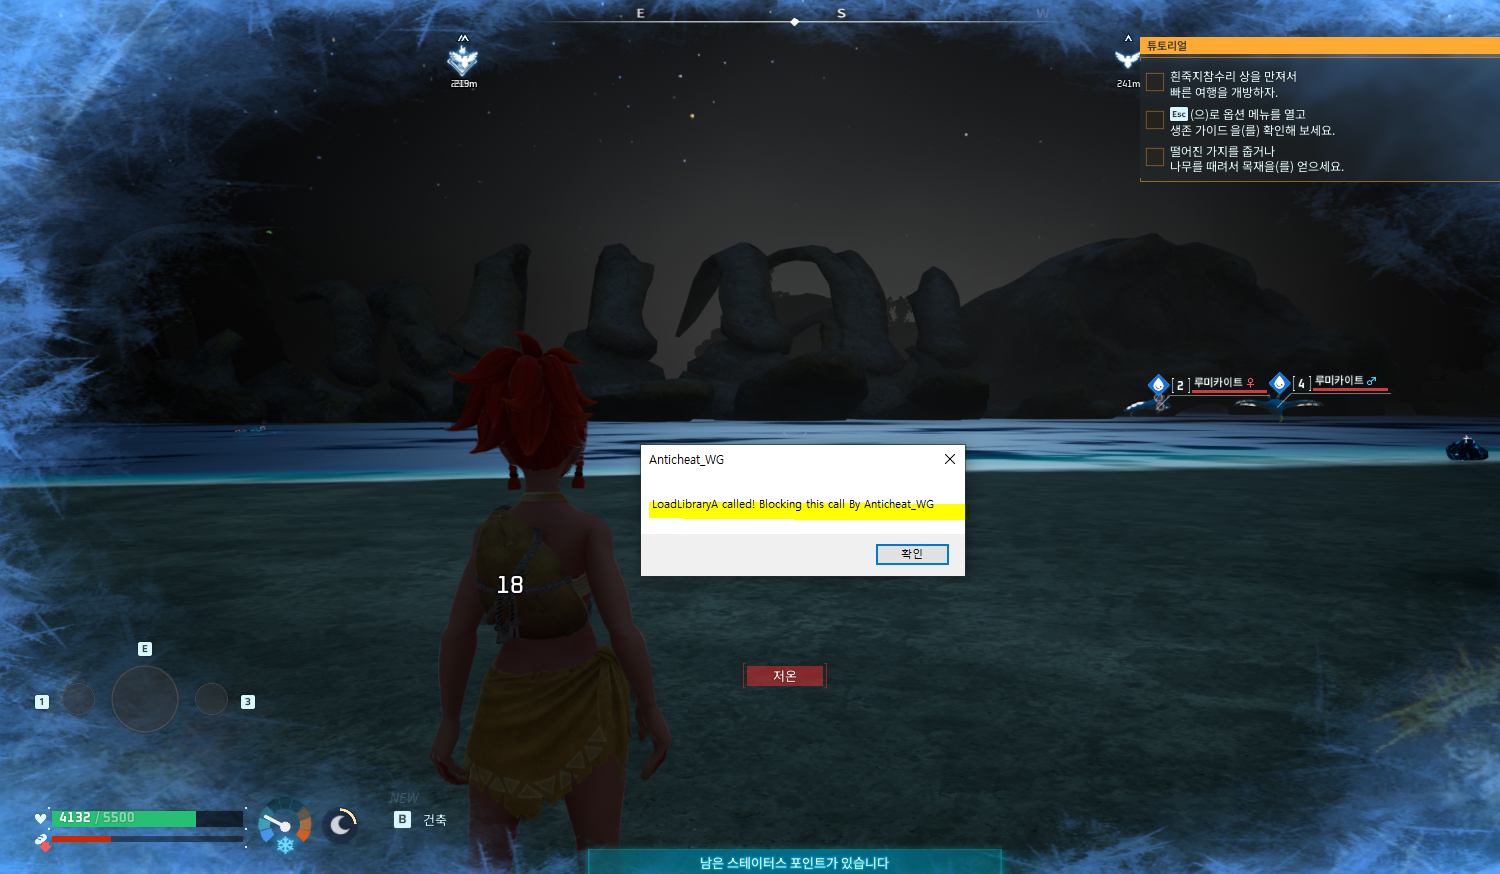
핵 탐지는 성공 ( 하지만 이 경고창이 예상과 다르게 5번 연속으로 발생하고 )
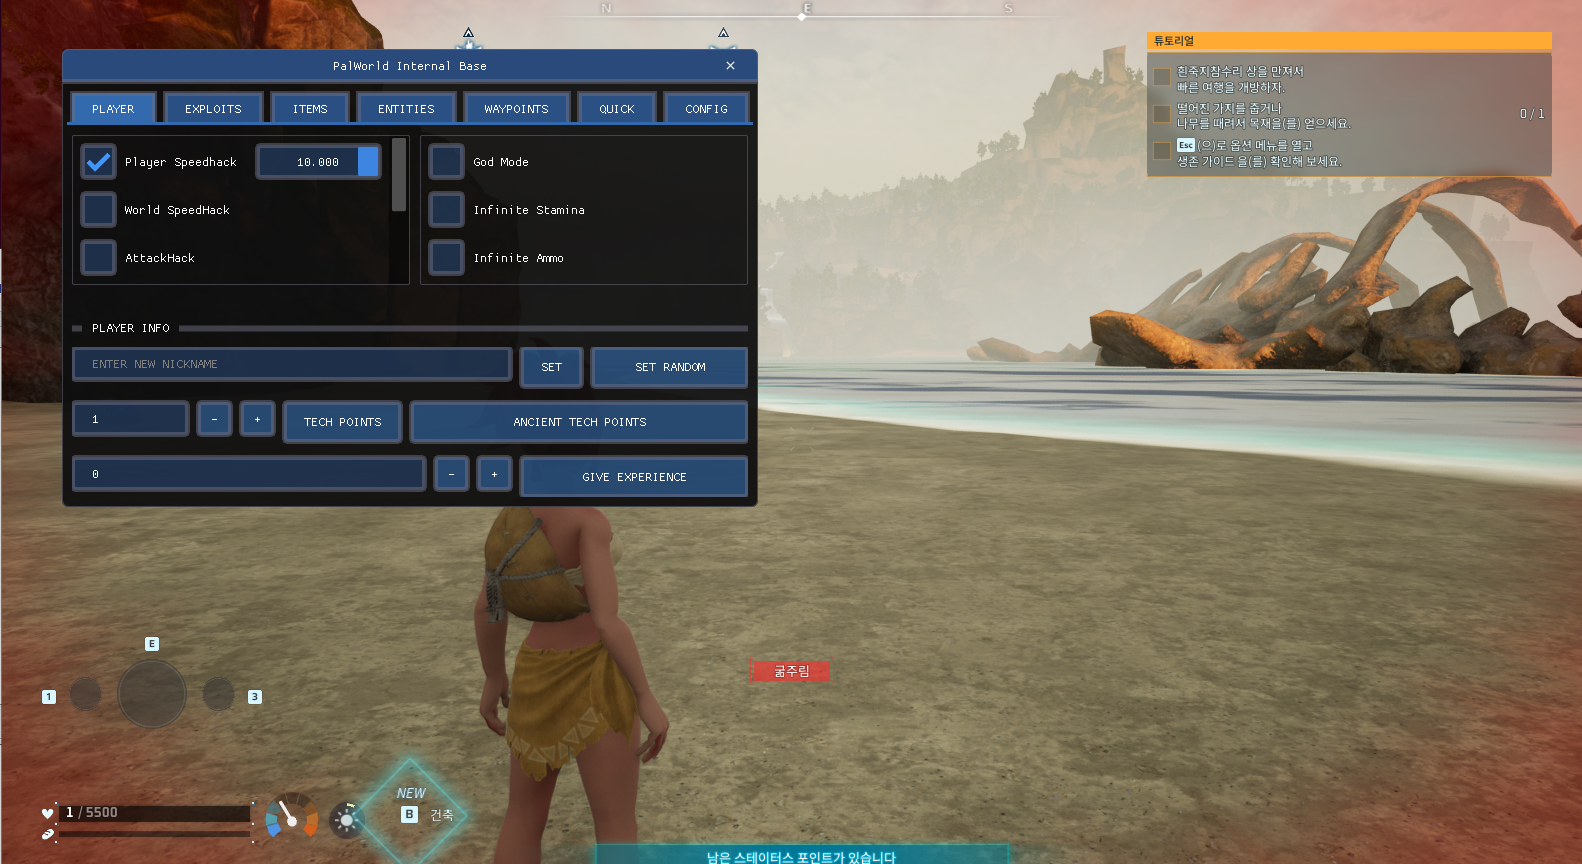
이후에 핵이 정상가동되었다.
→ 핵이 다른 방식으로 dll injection을 수행함
AntiCheat 2차 구현
핵 개발팀이 우리가 예상한 런처로 실행하지 않고 강력한 도구를 사용해서 핵을 런칭시키는 것을 확인하고 안티치트 보완에 착수했다. 일단 어떤 방식으로 LoadlibraryA를 사용하지 않고 dll을 올릴 수 있었을까
코드 분석
우리의 접근은 핵개발팀이 사용하는 dll injection 도구를 알아내 코드 분석을 실시 하였다.
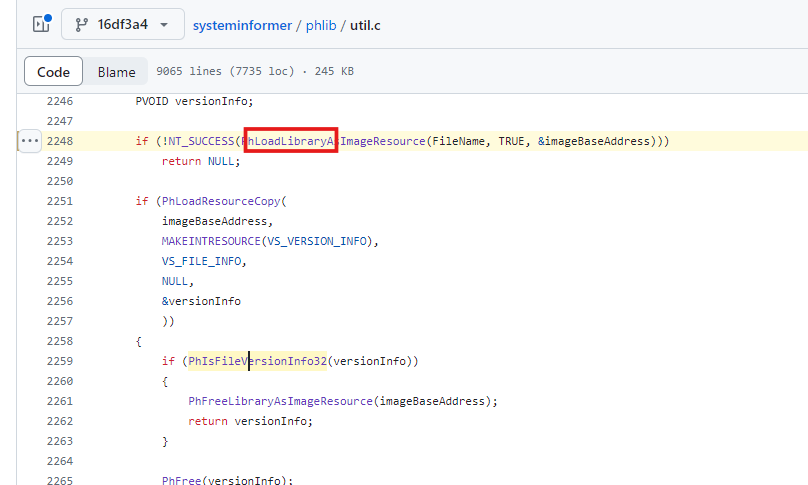
분석 중 LoadlibraryA도 사용함을 알 수 있었고
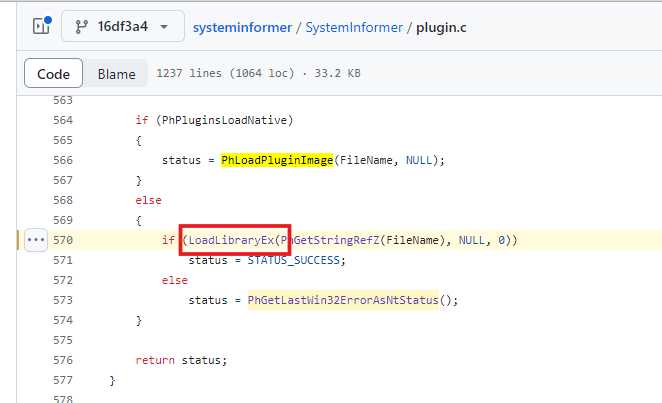
LoadLibraryEx도 사용함을 알 수 있었다. 여기서 우리는 분석을 마치고 LoadLibrary 파생에 대해서 알아보았다
LoadLibraryA : ANSI 버전의
LoadLibrary 함수
LoadLibraryEx(A) : LoadLibraryA의 확장버전 , 버전 로드 방식, 모듈 검색 경로 등을 제어 가능
LoadLibraryW : LoadLibraryA의 와이드 문자열(유니코드) 버전LoadLibraryExW : LoadLibraryW의 확장버전
이것들을 파악하고 이 모든 방식을 한가지의 훅함수로 이어지게 한뒤 Dll 탐지를 설계하였다.
수정된 코드 ( 최종 파일 맨 하단에 존재 )
	Real_LoadLibraryA = (LoadLibraryA_t)GetProcAddress(GetModuleHandle(TEXT("kernel32.dll")), "LoadLibraryA");
	if (Real_LoadLibraryA != NULL) {

		//printf("Real_LoadLibraryA address: %p\n", (void*)Real_LoadLibraryA);
		//fflush(stdout);

		char message[256];
		sprintf_s(message, sizeof(message), "Real_LoadLibraryA address: %p", (void*)Real_LoadLibraryA);
		MessageBoxA(NULL, message, "Anticheat_WG", MB_OK);

		LONG error = DetourAttach(&(PVOID&)Real_LoadLibraryA, (PVOID)Hooked_LoadLibraryA);
		if (error == NO_ERROR) {
			//printf("DetourAttach for LoadLibraryA succeeded.\n");
			//fflush(stdout);
		}
		else {
			MessageBox(NULL, TEXT(" Detour Attach Failed."), TEXT("Anticheat_WG Error"), MB_OK);
		}
	}


	Real_LoadLibraryW = (LoadLibraryW_t)GetProcAddress(GetModuleHandle(TEXT("kernel32.dll")), "LoadLibraryW");
	if (Real_LoadLibraryW != NULL) {


		char message[256];
		sprintf_s(message, sizeof(message), "Real_LoadLibraryW address: %p", (void*)Real_LoadLibraryW);
		MessageBoxA(NULL, message, "Anticheat_WG", MB_OK);

		LONG error = DetourAttach(&(PVOID&)Real_LoadLibraryW, (PVOID)Hooked_LoadLibraryA);
		if (error == NO_ERROR) {

		}
		else {
			//MessageBox(NULL, TEXT(" Detour Attach Failed."), TEXT("Anticheat_WG Error"), MB_OK);
		}
	}


	Real_LoadLibraryExA = (LoadLibraryExA_t)GetProcAddress(GetModuleHandle(TEXT("kernel32.dll")), "LoadLibraryExA");
	if (LoadLibraryExA != NULL) {


		char message[256];
		sprintf_s(message, sizeof(message), "Real_LoadLibraryExA address: %p", (void*)Real_LoadLibraryExA);
		MessageBoxA(NULL, message, "Anticheat_WG", MB_OK);

		LONG error = DetourAttach(&(PVOID&)Real_LoadLibraryExA, (PVOID)Hooked_LoadLibraryA);
		if (error == NO_ERROR) {

		}
		else {
			//MessageBox(NULL, TEXT(" Detour Attach Failed."), TEXT("Anticheat_WG Error"), MB_OK);
		}
	}

	Real_LoadLibraryExW = (LoadLibraryExW_t)GetProcAddress(GetModuleHandle(TEXT("kernel32.dll")), "LoadLibraryExW");
	if (LoadLibraryExA != NULL) {


		char message[256];
		sprintf_s(message, sizeof(message), "Real_LoadLibraryExW address: %p", (void*)Real_LoadLibraryExW);
		MessageBoxA(NULL, message, "Anticheat_WG", MB_OK);

		LONG error = DetourAttach(&(PVOID&)Real_LoadLibraryExW, (PVOID)Hooked_LoadLibraryA);
		if (error == NO_ERROR) {

		}
		else {
			//MessageBox(NULL, TEXT(" Detour Attach Failed."), TEXT("Anticheat_WG Error"), MB_OK);
		}
	}
기존에 LoadLibraryA 만 있었던 것을 총 4가지로 늘려 탐지 범위를 대폭 늘렸다. 그 이후에 각각의 함수의 훅 함수를 만든 것이 아닌 모두 한가지의 훅함수를 이어지게 하여 범용성을 늘렸다.
AntiCheat Flow
안티치트2 적용 ( with. 핵 개발팀 안현진님 )
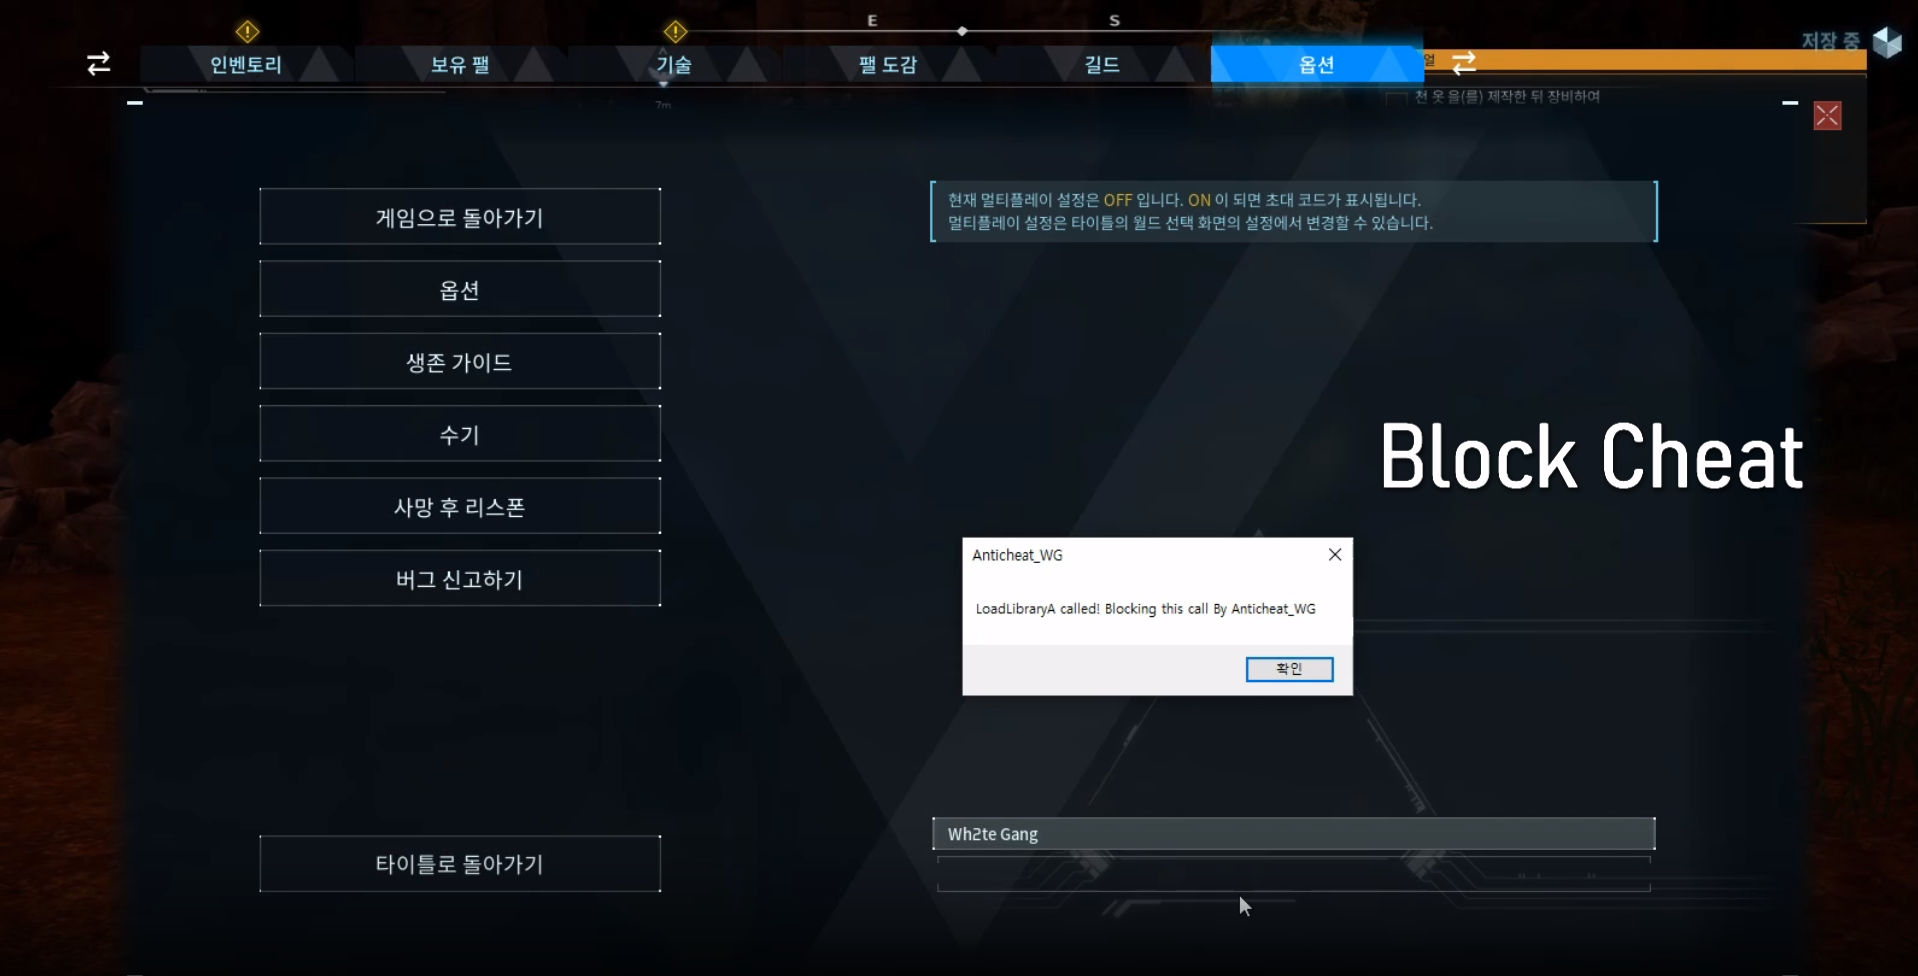
탐지를 성공했고 핵또한 injection되지 않아 UI가 생기지 않았으며 게임이 정상 작동되는 것을 볼 수 있다.
즉, 화이트리스트로 게임 속 필요한 DLL은 통과시키고 핵은 막는 안티치트를 완성시켰다.
AntiDebugger 1차 구현
우리는 안티 치트에서 더 나아가 안티 디버거 기능도 만들어보기로 했다.
윈도우 OS 를 개발한 마이크로소프트에서는 기본적으로 디버깅 API 를 제공한다. 그 중
CheckRemoteDebuggerPresent 와 IsDebuggerPresent 을 눈여겨 보았다.마이크로소프트 정식문서에 따르면 ,


CheckRemoteDebuggerPresent 와 IsDebuggerPresent 는 현재 프로세스에 디버거가 붙어있는지 확인 할 수 있는 API 이다. 따라서 , Anticheat가 프로세스에 laod 될때
SetDebuggerCheckTimer() 를 실행시키고 void CALLBACK TimerProc(HWND hWnd, UINT uMsg, UINT_PTR idEvent, DWORD dwTime) { CheckForDebugger(); } // 타이머 설정 void SetDebuggerCheckTimer() { SetTimer(NULL, 0, 5000, (TIMERPROC)TimerProc); // 5초마다 }
SetDebuggerCheckTimer() → SetDebuggerCheckTimer() → TimerProc() 을 통해
CheckForDebugger() 함수를 5초마다 실행시켜 지속적으로 탐지 할 수 있도록 설계를 하였다.CheckForDebugger 에는 다음과 같이 void CheckForDebugger() { // IsDebuggerPresent if (IsDebuggerPresent()) { MessageBox(NULL, TEXT("Debugger detected by Anticheat_WG"), TEXT("Anticheat_WG"), MB_OK); return; } // CheckRemoteDebuggerPresent BOOL debuggerPresent = FALSE; CheckRemoteDebuggerPresent(GetCurrentProcess(), &debuggerPresent); if (debuggerPresent) { MessageBox(NULL, TEXT("Remote debugger detected by Anticheat_WG"), TEXT("Anticheat_WG"), MB_OK); return; } }
CheckForDebugger 와 CheckRemoteDebuggerPresent 를 통해 탐지가 되면 MessageBox로 탐지가 되었음을 알리는 구조로 설계하였다.
하지만,
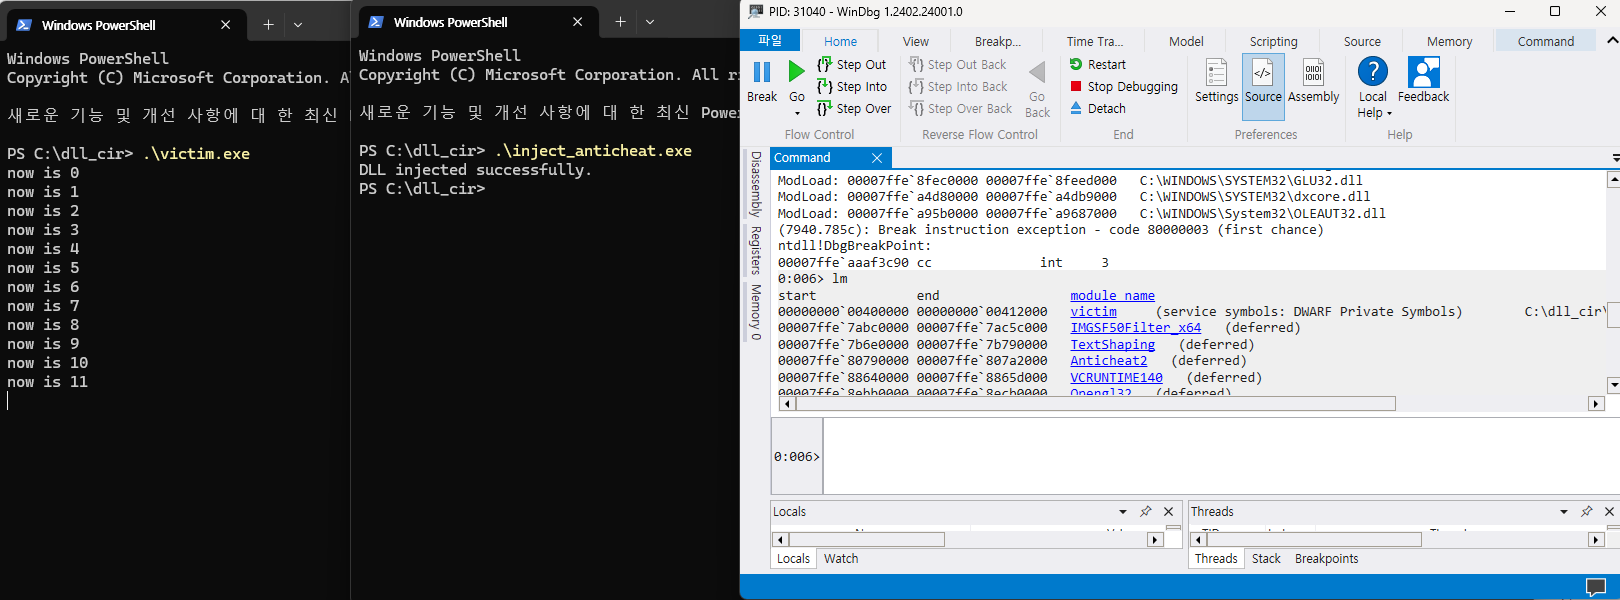
figure . 맨 왼쪽부터 vitim 프로세스 , 안티치트 실행 , windbg 를 victim 프로세스에 붙인 모습
대표적인 dbg인 windbg 조차 탐지하지 못했다. 원인을 분석한 결과,
CheckForDebugger와 CheckRemoteDebuggerPresent 는 PEB (Process Environment Block) 안에 있는 플래그값 ( PEB.BeingDebugged) 을 통해 true와 false를 반환한다.
PEB (Process Environment Block) 이란
윈도우 운영체제에서 각 프로세스에 대한 정보를 저장하는 데이터 구조이다. 하지만 중요한 점은 이 PEB은 사용자모드에서 접근을 할 수 있다는 점이다. 즉, 디버거에서 PEB.BeingDebugged를 바꿔주면
CheckForDebugger와 CheckRemoteDebuggerPresent 는 디버거를 감지해도 정상적인 값을 반환하지 못한다.
AntiDebugger 2차 구현
기존에 있는 방식은 대부분에 디버거가 우회를 하고 있다. 어떻게 하면 좀더 발전된 AntiDebugger를 만들 수 있을까
우리는 3가지를 추가적으로 제안했다.
NtQueryInformationProcess_t , debug 예외 처리 , 디버그 레지스터 체크NtQueryInformationProcess
NtQueryInformationProcess는 ntdll.dll 모듈에 정의된 함수로 특정 프로세스에 대해 쿼리를 작성할 수 있다. 여러가지 쿼리가 존재하며 그중 0x1F 쿼리는 ProcessDebugPort 에 대한 정보를 쿼리한다.
ProcessDebugPort 는 현재 프로세스가 디버깅 중인지 판단하며 ,
쿼리 결과가 성공적(
status == 0x00000000)이고 debugger 값이 0이 아닌 경우, 프로세스가 디버깅되고 있음을 나타낸다.void CheckForDebugger() { ... ( 다른 방법들 ) // NtQueryInformationProcess typedef NTSTATUS(WINAPI* NtQueryInformationProcess_t)(HANDLE, UINT, PVOID, ULONG, PULONG); NtQueryInformationProcess_t NtQueryInformationProcess = (NtQueryInformationProcess_t)GetProcAddress(GetModuleHandle(TEXT("ntdll.dll")), "NtQueryInformationProcess"); if (NtQueryInformationProcess) { DWORD debugger = 0; NTSTATUS status = NtQueryInformationProcess(GetCurrentProcess(), 0x1F, &debugger, sizeof(debugger), NULL); if (status == 0x00000000 && debugger) { MessageBox(NULL, TEXT("Debugger detected by NtQueryInformationProcess (Anticheat_WG) "), TEXT("Anticheat_WG"), MB_OK); return; } } ... ( 다른 방법들 )
debug 예외 처리 ( 브레이크포인트 )
RaiseException(EXCEPTION_BREAKPOINT, 0, 0, NULL) 는 브레이크문을 만났을 때 생기는 예외를 발생시킨다. 만약 디버거가 프로세스에 붙어있다면 이 예외를 디버거에서 처리할 것이다.
이를 통해 우리는 디버거를 찾고자 하였다.
bool IsDebuggerPresentViaException() {

	BOOL debuggerDetected = true;
	__try {
		// 예외를 유발
		RaiseException(EXCEPTION_BREAKPOINT, 0, 0, NULL);
	}
	__except (EXCEPTION_EXECUTE_HANDLER) {
		return false;
	}
	return debuggerDetected;
}


	void CheckForDebugger() {

	... ( 다른 방법들 )

		// UnhandledExceptionFilter
	if (IsDebuggerPresentViaException()) {
		MessageBox(NULL, TEXT("Debugger detected by UnhandledExceptionFilter (Anticheat_WG)"), TEXT("Anticheat_WG"), MB_OK);
	}
	else {
		//MessageBox(NULL, TEXT("No debugger detected by UnhandledExceptionFilter (Anticheat_WG)"), TEXT("Anticheat_WG"), MB_OK);
	}

... ( 다른 방법들 )


}
로직은 간단하다.
디버거가 있는 경우 → 예외를 처리하기에 debuggerDetected = true 를 그대로 반환
디버거가 없는 경우 → 예외를 __except에서 처리하므로 false를 반환
디버그 레지스터 체크 flow
GetThreadContext 함수는 지정된 스레드의 컨텍스트를 가져온다.현재 스레드(
GetCurrentThread())의 컨텍스트를 가져온다.이때 컨텍스트를 CONTEXT_DEBUG_REGISTERS 로 설정한다면 DEBUG_REGISTERS의 정보를 가져올 수 있다.
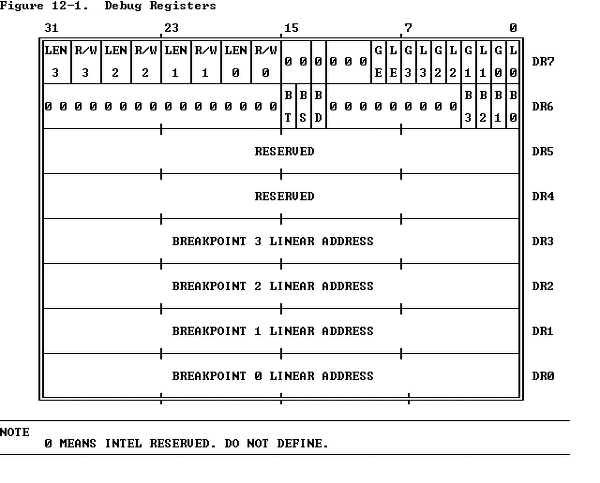
DEBUG_REGISTERS의 정보를 보았을때,
디버그 레지스터는 DR1 ~ DR7 으로 이루어져 있다.
Dr0, Dr1, Dr2, Dr3: 하드웨어 브레이크포인트를 설정하는 레지스터입니다. 각 레지스터는 특정 메모리 주소에 대한 하드웨어 브레이크포인트를 설정할 수 있다.
Dr6: 디버그 상태 레지스터로, 브레이크포인트가 발생했을 때의 상태를 나타낸다.
Dr7: 디버그 제어 레지스터로, 브레이크포인트의 설정 상태를 제어한다.
	// 디버그 레지스터 체크
	CONTEXT context = { 0 };
	context.ContextFlags = CONTEXT_DEBUG_REGISTERS;
	if (GetThreadContext(GetCurrentThread(), &context)) {
		if (context.Dr0 || context.Dr1 || context.Dr2 || context.Dr3 || context.Dr6 || context.Dr7) {
			MessageBox(NULL, TEXT("Hardware breakpoint detected!"), TEXT("Anticheat_WG"), MB_OK);
			return;
		}
	}
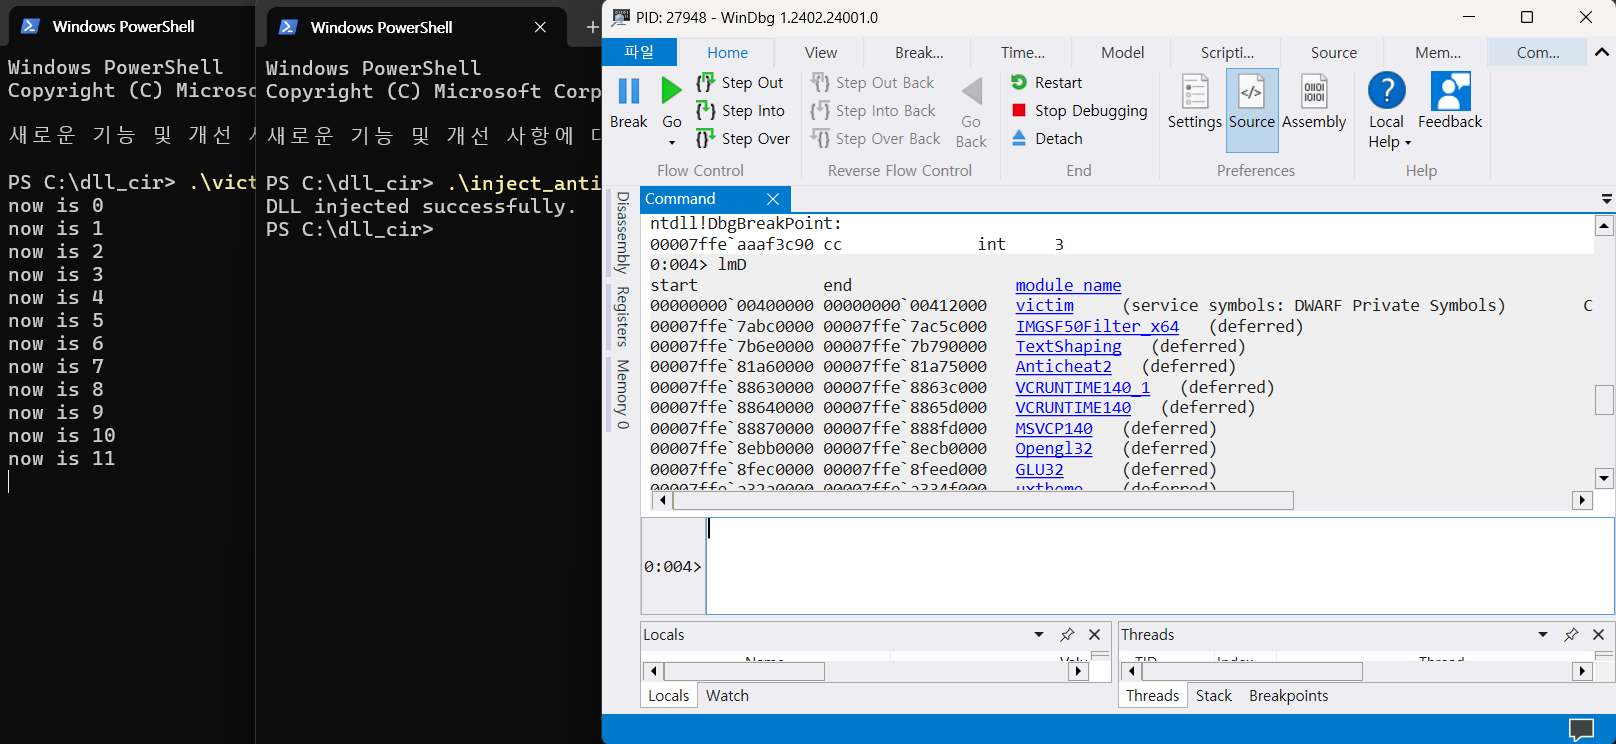
하지만, 결과는 아쉽게도 windbg를 탐지하지 못했다.
AntiDebugger 3차 구현
3차구현은 좀더 강력하고 확실한 방법을 제안했다.
우리가 동작시키는 디버거는 윈도우 운영 체제의 GUI 로 이루어져 있다.
이러한 GUI는 다음과 같은 정보를 포함시킨다.
- 윈도우 클래스 (Window Class)
윈도우 클래스는 윈도우의 속성과 동작을 정의하는 템플릿
- 윈도우 이름 (Window Text)
윈도우 이름은 윈도우의 텍스트 또는 타이틀 바에 표시되는 문자열
이러한 정보를 프로세스로 부터 가져올 수 있는 함수는 각각
GetClassName GetWindowText 이다.그렇다면 클래스 이름으로 Windbg를 탐지하려고 한다. 윈도우 이름은 창 부분을 보면 바로 보이지만, , 클래스는 일반적인 방식으로는 볼 수 있다.
SPY++
Visual studio 에서 제공하는 강력한 도구로 클래스 이름을 볼 수 있다.
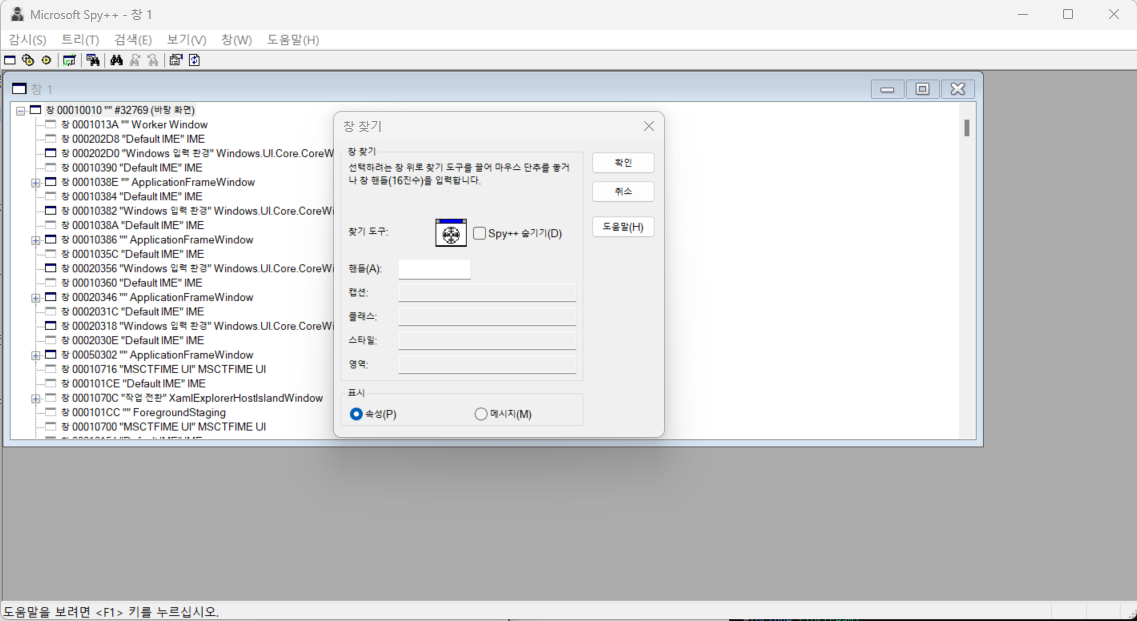
사용예시 : Chrome
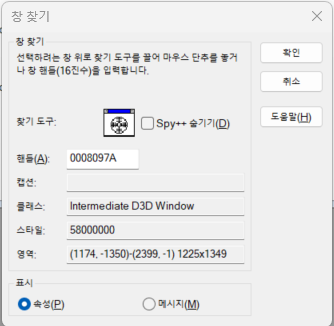
figure . Chrome 프로그램을 분석
사진과 같이 chrome 프로그램은 Intermediate D3D Window 다음과 같은 클래스가 고정되어 있다.
Windbg 탐지
해당 툴을 사용해서 Windbg를 분석해보면
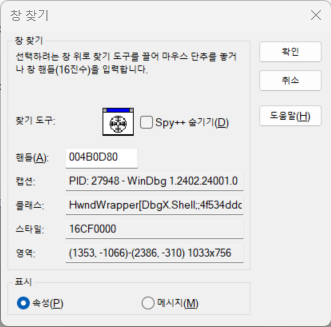
다음과 같이 클래스가
HwndWrapper[DbgX.Shell;;4f534ddc-551d-4ccb-b262-13a202dd05af] 라고 되어있다.여기서 일반적으로 클래스가 고정되어 있다는 점을 생각하면 아무리 봐도 이상한 문자열이다.
이상함을 감지한 안티치트 개발팀은 windbg를 다시 켜보고 SPY++로 분석해보니
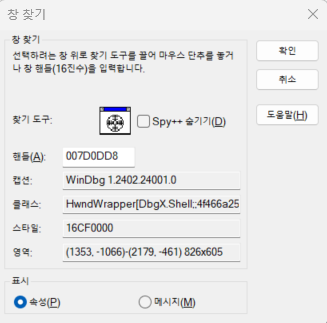
HwndWrapper[DbgX.Shell;;4f466a25-05af-44a9-a9cd-2313f898f215] 와 같이 다른 문자열이 나왔다.즉, Windbg 는 클래스네임을 통한 디버거 감지를 회피하기 위해 랜덤 문자열을 뒤에 붙인다.
하지만, 같은 문자열이 존재함으로 단순한 방식으로 이제 Windbg를 탐지할 수 있다.
BOOL IsWinDbgRunning() {
	HWND hwnd = GetTopWindow(NULL);
	TCHAR className[256];

	while (hwnd != NULL) {
		if (GetClassName(hwnd, className, sizeof(className) / sizeof(TCHAR))) {
			// 클래스 이름에 문자열이 포함되는지 확인
			if (_tcsstr(className, TEXT("HwndWrapper[DbgX.Shell;;")) != NULL) {   // spy++  로 확인한 문자열
				return TRUE; // WinDbg 실행 중
			}
		}
		hwnd = GetNextWindow(hwnd, GW_HWNDNEXT);
	}
	return FALSE; // WinDbg 실행 중 아님
}
HWND hwnd = GetTopWindow(NULL); 로 최상위 윈도우의 핸들을 가져오고, 각각의 핸들을 검사하면서,
HwndWrapper[DbgX.Shell;; 가 클래스에 존재하는 윈도우창이 존재하면 Windbg로 판단해 탐지한다. 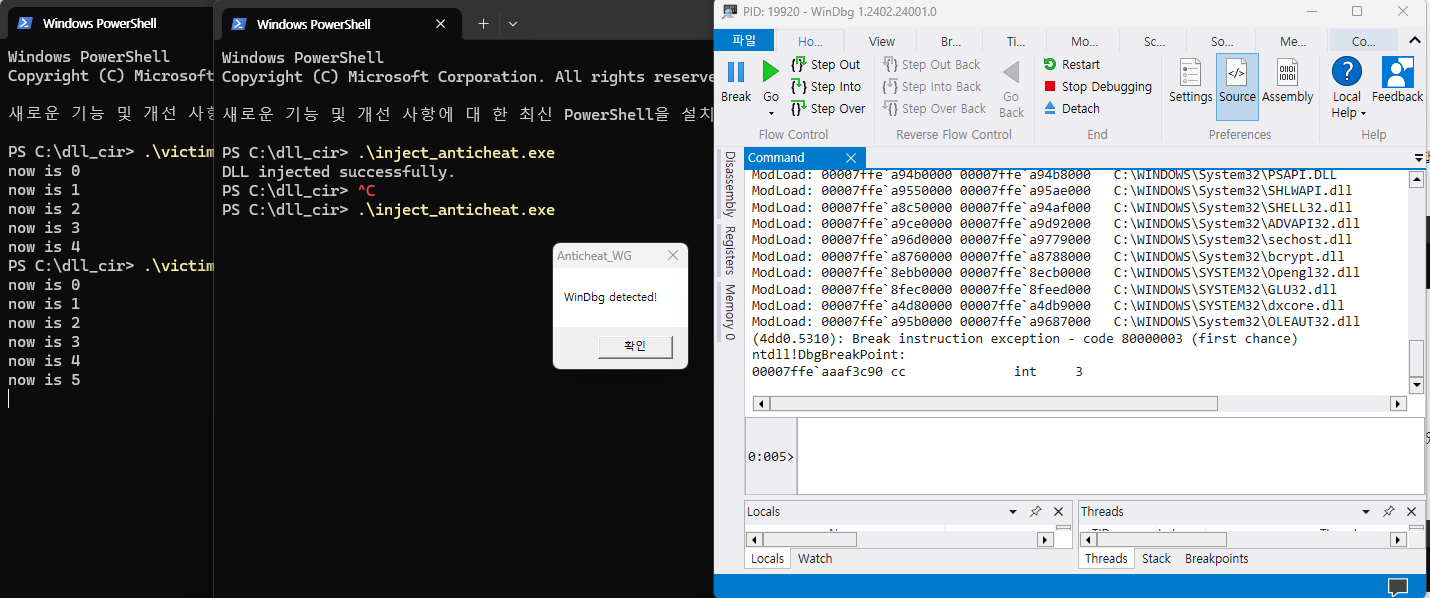
탐지 성공!
Cheat Engine 탐지
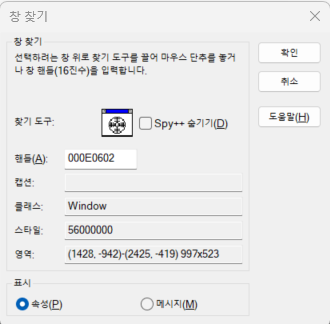
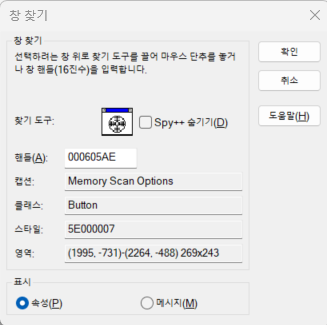
Cheat Engine은 역시 아예 클래스를 다음과 같이 기본적인 Window나 Button을 노출시킴으로써 클래스를 검색했을때 탐지할 수 가 없다. Window 나 Button과 같은 클래스는 CheatEngine에서만 쓰는 것이 아니기 때문이다. 그래서 우리팀은 윈도우 이름 (Window Text) 으로 접근하였다.
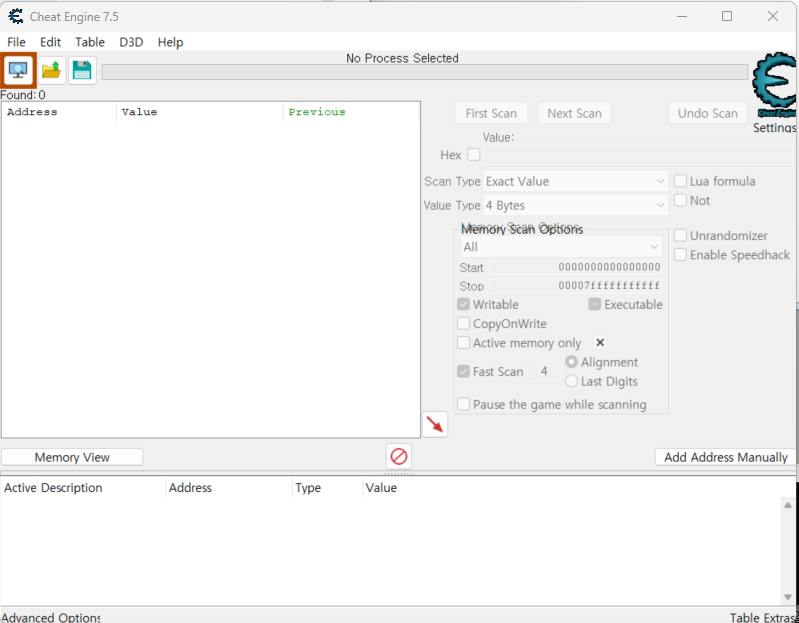
당연히 버전이 다른것도 탐지를 해야하기에 Cheat Engine을 타겟 문자열로 선정했다.
BOOL CALLBACK EnumWindowsProc(HWND hwnd, LPARAM lParam) {
	TCHAR windowTitle[256];
	GetWindowText(hwnd, windowTitle, sizeof(windowTitle) / sizeof(TCHAR));

	// 창 제목에 CheatEngine 이 포함되었는지 확인
	if (_tcsstr(windowTitle, TEXT("Cheat Engine")) != NULL) {
		*((BOOL*)lParam) = TRUE;
		return FALSE; // 찾았으므로 끝!
	}
	return TRUE; // 계속 열거
}

BOOL IsCheatEngineRunning() {
	BOOL CheatEngineFound = FALSE;
	EnumWindows(EnumWindowsProc, (LPARAM)&CheatEngineFound);
	return CheatEngineFound;
}
EnumWindows() 함수는 시스템의 모든 윈도우를 열거하고 각각의 윈도우에 첫번째 매개변수의 함수를 실행시킨다. 즉 , 각각의 윈도우에 EnumWindowsProc 함수를 실행시킨다.EnumWindowsProc 함수는 GetWindowText 함수를 통해 윈도우의 제목을 가져온뒤
”Cheat Engine” 이라는 문자열이 존재하면 Cheat Engine을 판단해 탐지한다.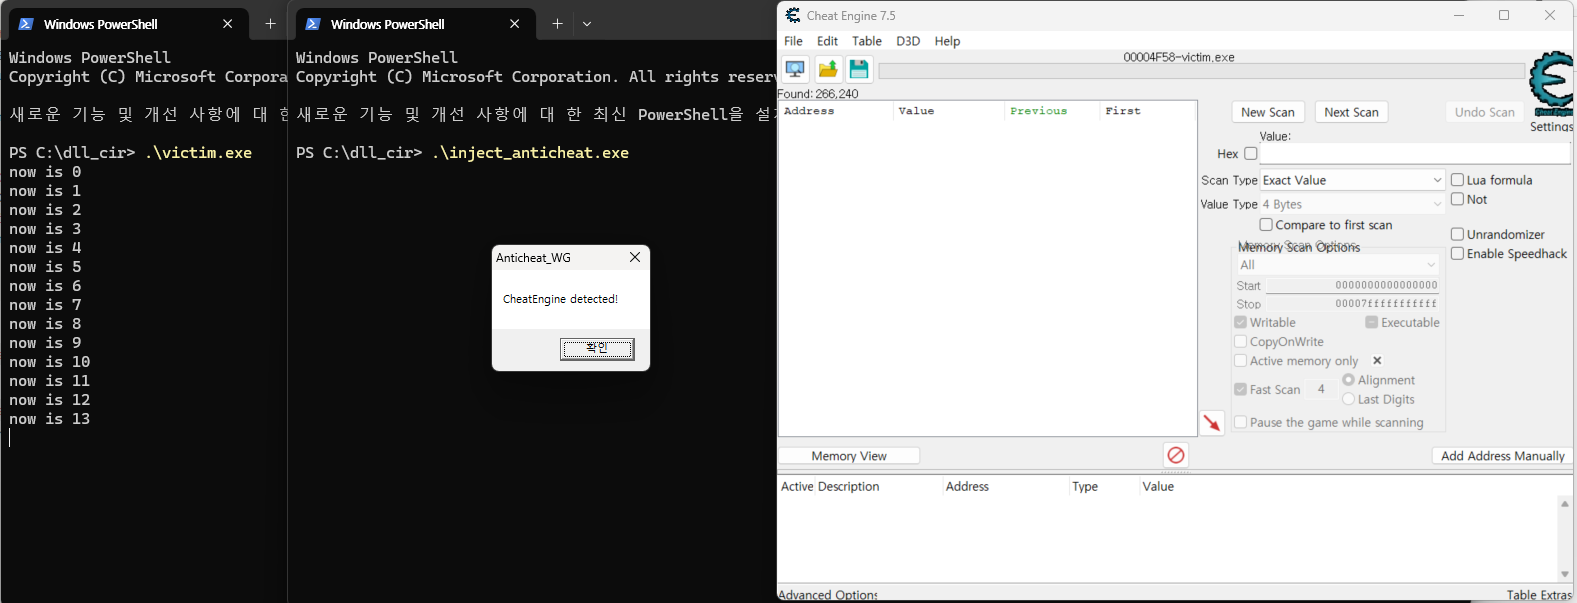
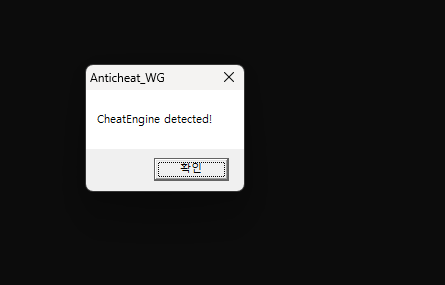
탐지 성공!